Category: MCP

  • MCP in the Wild: Real-World Patterns and the Agentic Ecosystem

    MCP in the Wild: Real-World Patterns and the Agentic Ecosystem

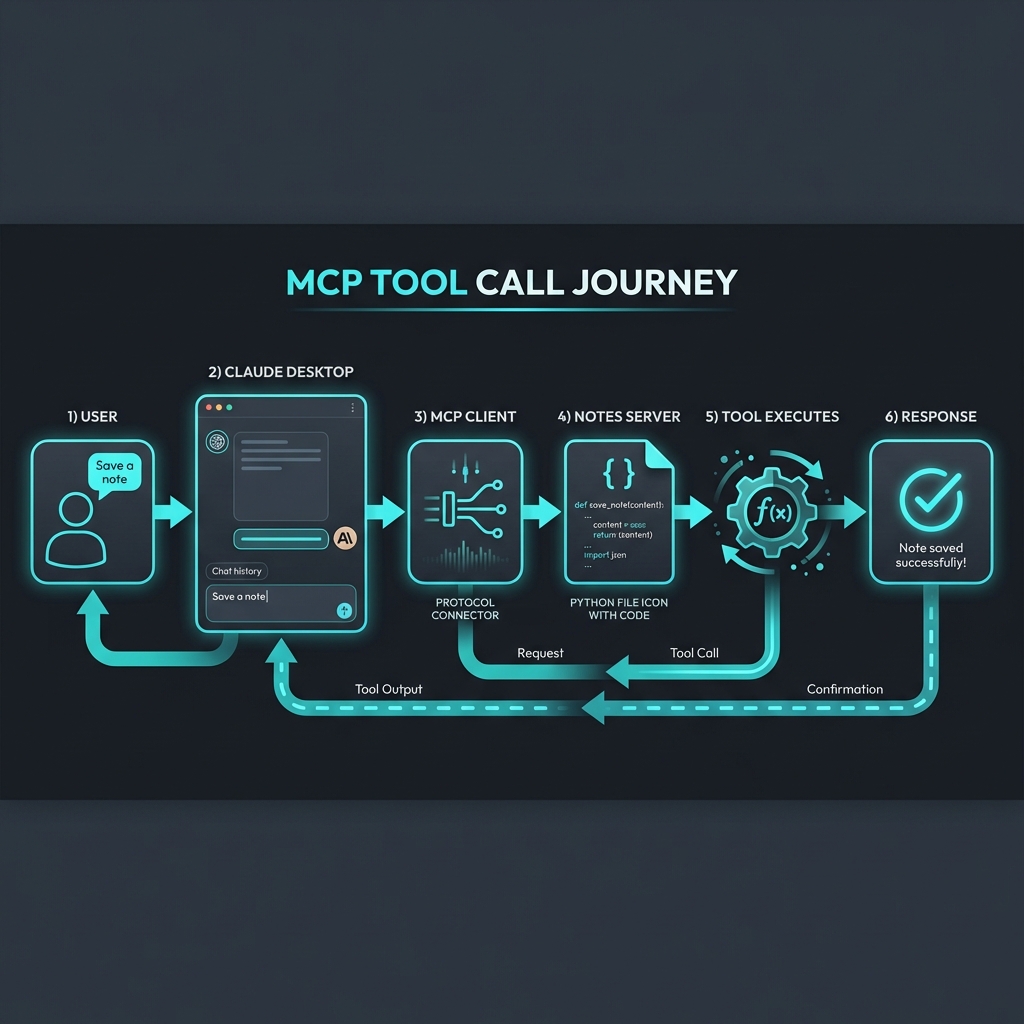
    In the [last post](/mcp-build), we built a Notes Server in 20 minutes. It was a great exercise, but it was just one server talking to one host.

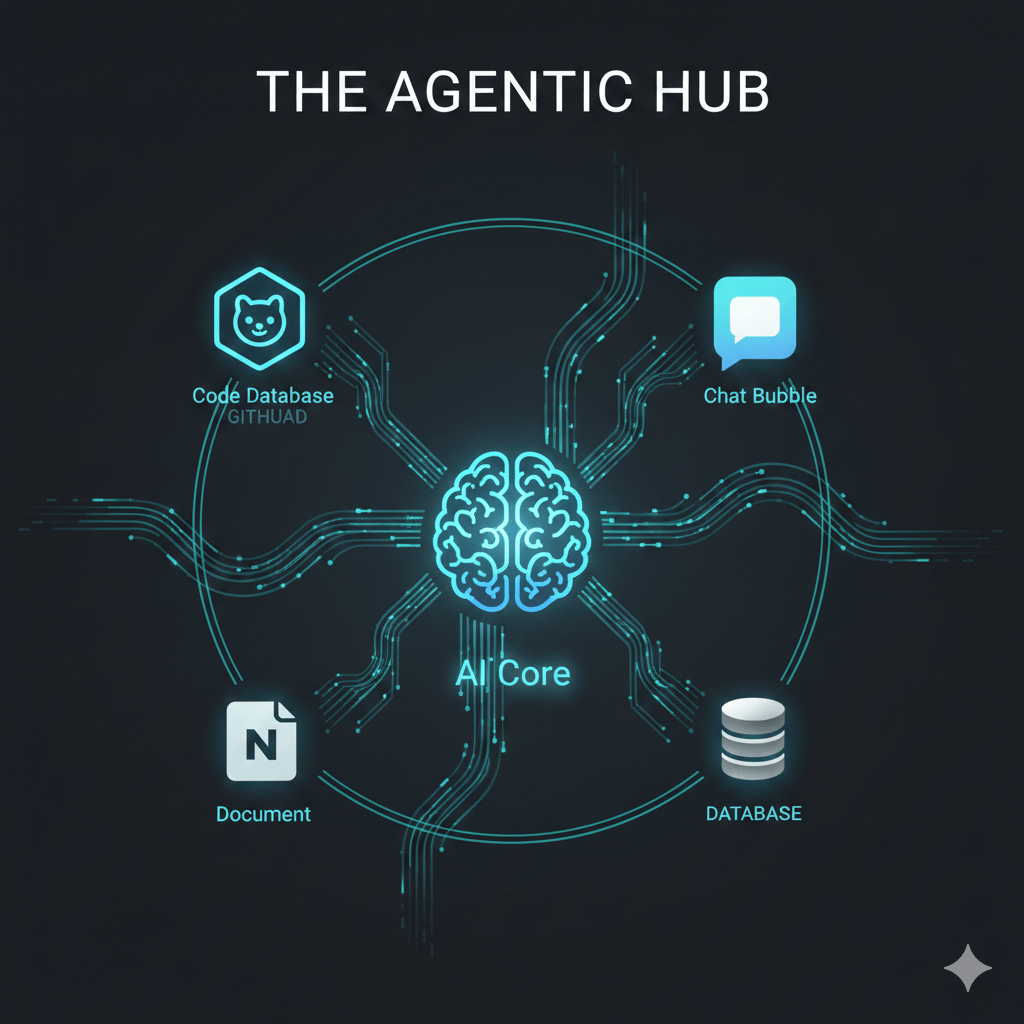
    Now, imagine that same concept scaled across your entire workflow. Imagine your AI assistant having the “hands and eyes” to interact with your local files, your company’s internal databases, and your favorite SaaS tools—all at the same time, through a single, unified protocol.

    This is where the Model Context Protocol (MCP) shifts from a cool developer tool to a fundamental shift in how we work. We aren’t just building connectors anymore; we’re building an Agentic Ecosystem.

    The Explosion of the MCP Registry

    When Anthropic released MCP, they didn’t just drop a spec; they dropped a catalyst. Within months, the community responded with an explosion of servers.

    If you head over to the [MCP Registry](https://registry.modelcontextprotocol.io/), you’ll see servers for almost everything:

    • Search: Brave Search, Exa Search, Perplexity.
    • Development: GitHub, GitLab, Bitbucket, Kubernetes, Docker.
    • Knowledge: Notion, Confluence, Slack, Google Drive.
    • Data: PostgreSQL, MySQL, SQLite, Snowflake.

    This isn’t just a list of plugins. It’s a library of capabilities that any MCP-compliant AI (Claude, Cursor, Zed, etc.) can “plug into” instantly. The N×M integration problem we discussed in Blog 1 is being solved in real-time by a global community of builders.

    But how do you actually use these in a real workflow? Let’s look at the patterns emerging in the wild.

    Pattern 1: The Local Power-User

    This is the most common entry point. A developer or researcher running Claude Desktop on their machine, connected to a few local MCP servers.

    The Stack:

    1. Filesystem Server: Gives the AI read/write access to a local project folder.

    2. Brave Search Server: Allows the AI to look up documentation or current events.

    3. SQLite Server: Lets the AI query a local database of research notes or logs.

    The Use Case:

    You ask Claude: “Analyze the logs in `/logs/today.txt`, find the error codes, and cross-reference them with the schema in my `errors.db` database. Then, search the web to see if there’s a known fix for these specific codes.”

    In one prompt, the AI uses three different servers to perform a multi-step research task that would have previously required you to copy-paste data between four different windows.

    Pattern 2: The Service Hub (SaaS Integration)

    For teams, MCP becomes the “glue” between fragmented SaaS tools. Instead of building a custom “Slack-to-Notion” bot, you simply run MCP servers for both.

    The Stack:

    1. Slack Server: To read and post messages.

    2. GitHub Server: To manage issues and PRs.

    3. Notion Server: To update documentation.

    The Use Case:

    “Check the latest messages in the #deploy-alerts channel. If there’s a bug report, find the relevant code in GitHub, create an issue, and add a summary to our ‘Known Bugs’ page in Notion.”

    The AI acts as an autonomous coordinator, bridging the silos that usually slow teams down.

    Pattern 3: The Data Bridge (The Enterprise Play)

    This is where the “Integration Tax” really starts to drop for companies. Most enterprises have proprietary data locked behind internal APIs or legacy databases. Traditionally, making this data available to an AI meant building a complex, custom-coded “AI Gateway.”

    With MCP, you build one internal MCP server.

    The Pattern:

    • You create an MCP server that wraps your internal “Customer 360” API.
    • You deploy this server internally.
    • Your employees connect their MCP-compliant tools (like Claude) to this internal endpoint.

    Suddenly, your internal data is “AI-ready” without you having to build a single custom frontend or chat interface. The AI assistant already knows how to talk to it because it speaks the standard protocol.

    Pattern 4: Server Stacking (The Orchestration Layer)

    One of the most powerful features of MCP is that a single Host can connect to multiple Servers simultaneously. This is called Server Stacking.

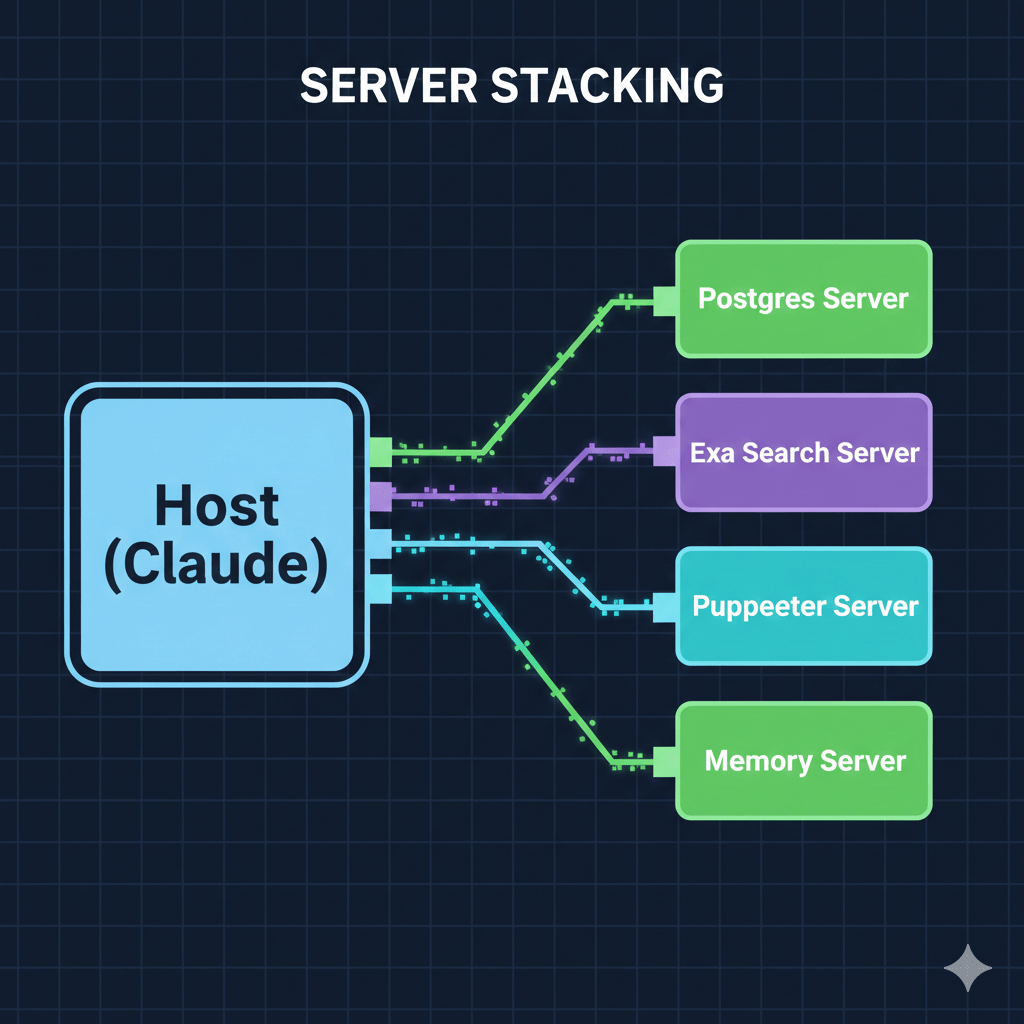
    Image: [MCP Server Stacking Diagram]

    When you ask a complex question, the Host (Claude) doesn’t just pick one server. It looks at the capabilities of all connected servers and orchestrates a plan. It might use the Postgres Server to get raw data, then use the Puppeteer Server to take a screenshot of a dashboard, and finally use the Memory Server to store its findings for your next session.

    This orchestration happens automatically. You don’t tell the AI which server to use; you tell it what you want to achieve, and it picks the right tools for the job.

    Why the “Integration Tax” is Dead

    We used to spend 80% of our time on the “plumbing”—handling auth, mapping fields, managing API versions—and only 20% on the actual logic.

    MCP flips that. Because the interface is standardized, the plumbing is a solved problem. When you connect a GitHub MCP server, you aren’t “integrating GitHub”; you are simply giving your AI the “GitHub skill.”

    We are moving toward a world where software doesn’t just have a UI for humans and an API for developers—it has an MCP Server for Agents.

    What’s Next

    We’ve seen the “Why,” the “How,” and the “Where.” But there’s one elephant in the room we haven’t addressed: Security.

    If an AI can read your files, query your database, and post to your Slack, how do you make sure it only does what it’s supposed to do? How do you manage permissions in an agentic world?

    In the final post of this series, Blog 5, we’ll dive into Security, OAuth, and the Agentic Future. We’ll talk about human-in-the-loop patterns, permission scopes, and how to build “Safe-by-Design” AI systems.

    This is the fourth post in a series on MCP. Here’s what’s coming:

    1. ✅ This Post: Why MCP matters

    2. ✅ Blog 2: Under the Hood—deep dive into architecture, transports, and the protocol spec

    3. ✅ Blog 3: Build Your First MCP Server in 20 minutes (Python/TypeScript)

    4. ✅ Blog 4: MCP in the Wild—real-world patterns and use cases

    5. Blog 5: Security, OAuth, and the agentic future

    Explore the ecosystem: Browse the [MCP Registry](https://registry.modelcontextprotocol.io/) or contribute your own server to the [community list](https://github.com/modelcontextprotocol/servers).

  • Build Your First MCP Server in 20 Minutes

    Build Your First MCP Server in 20 Minutes

    In the [last post](/mcp-architecture), we went deep on how MCP works—the protocol handshake, JSON-RPC messages, and transport layers. Now it’s time to get our hands dirty.

    By the end of this post, you’ll have a working MCP server running on your machine. We’re going with Python because it’s the fastest path to “holy crap, this actually works.”

    No frameworks. No boilerplate hell. Just a single file that turns your code into something Claude can actually use.

    What We’re Building

    We’re creating a Notes Server—a simple tool that lets Claude:

    • Save notes with a title and content
    • List all saved notes
    • Read a specific note by title
    • Search notes by keyword
    • Delete notes

    It’s simple enough to build in 20 minutes, but real enough to teach you everything you need to know about MCP.

    Why notes instead of another weather API example? Because notes are stateful. They persist between calls. That’s where MCP starts to get interesting.

    Prerequisites

    Before we start, make sure you have:

    • Python 3.10+ installed
    • Claude Desktop or another MCP-compatible client
    • About 20 minutes of uninterrupted time

    That’s it. No complex setup, no cloud accounts.

    Step 1: Set Up the Project

    First, let’s create a project directory and install the MCP SDK. We’re using uv because it’s fast and handles virtual environments cleanly:

    # Install uv if you haven’t already
    # Windows (PowerShell)
    irm https://astral.sh/uv/install.ps1 | iex

    # macOS/Linux
    curl -LsSf https://astral.sh/uv/install.sh | sh

    Now set up the project:

    # Create project directory
    uv init mcp-notes-server
    cd mcp-notes-server

    # Create and activate virtual environment
    uv venv
    # Windows
    .venv\Scripts\activate
    # macOS/Linux
    source .venv/bin/activate

    # Install MCP SDK
    uv add “mcp[cli]”

    # Create our server file
    # Windows
    type nul > notes_server.py
    # macOS/Linux
    touch notes_server.py

    Your project structure should look like this:

    mcp-notes-server/
    ├── .venv/
    ├── pyproject.toml
    └── notes_server.py

    Step 2: The Minimal Server

    Let’s start with the absolute minimum—a server that does nothing but exist. Open notes_server.py and add:

    from mcp.server.fastmcp import FastMCP

    # Initialize the MCP server with a name
    mcp = FastMCP(“notes”)

    if __name__ == “__main__”:
        mcp.run(transport=”stdio”)

    That’s a valid MCP server. It doesn’t do anything useful yet, but it speaks the protocol.

    The FastMCP class handles all the protocol machinery—handshakes, message routing, capability negotiation. We just need to tell it what tools to expose.

    Step 3: Add State (The Notes Storage)

    Before we add tools, we need somewhere to store notes. For simplicity, we’ll use an in-memory dictionary. In production, you’d use a database.

    from mcp.server.fastmcp import FastMCP
    from datetime import datetime

    # Initialize the MCP server
    mcp = FastMCP(“notes”)

    # In-memory storage for notes
    # Key: title (str), Value: dict with content and metadata
    notes_db: dict[str, dict] = {}

    Step 4: Add Your First Tool

    Now the fun part. Let’s add a tool that saves notes:

    @mcp.tool()
    def save_note(title: str, content: str) -> str:
        “””
        Save a note with a title and content.
       
        Args:
            title: The title of the note (used as identifier)
            content: The content of the note
        “””
        notes_db[title] = {
            “content”: content,
            “created_at”: datetime.now().isoformat(),
            “updated_at”: datetime.now().isoformat()
        }
        return f”Note ‘{title}’ saved successfully.”

    That’s it. One decorator. The @mcp.tool() decorator does several things:

    1. Registers the function as an MCP tool

    2. Generates the input schema from type hints (title: str, content: str)

    3. Extracts the description from the docstring

    4. Handles the JSON-RPC wrapper automatically

    When Claude calls tools/list, it will see something like:

    {
      “name”: “save_note”,
      “description”: “Save a note with a title and content.”,
      “inputSchema”: {
        “type”: “object”,
        “properties”: {
          “title”: {“type”: “string”, “description”: “The title of the note (used as identifier)”},
          “content”: {“type”: “string”, “description”: “The content of the note”}
        },
        “required”: [“title”, “content”]
      }
    }

    The SDK parsed your docstring and type hints to build that schema. No manual JSON schema writing required.

    Step 5: Complete the Tools

    Let’s add the remaining tools:

    @mcp.tool()
    def list_notes() -> str:
        “””
        List all saved notes with their titles and creation dates.
        “””
        if not notes_db:
            return “No notes saved yet.”
       
        note_list = []
        for title, data in notes_db.items():
            note_list.append(f”- {title} (created: {data[‘created_at’][:10]})”)
       
        return “Saved notes:\n” + “\n”.join(note_list)


    @mcp.tool()
    def read_note(title: str) -> str:
        “””
        Read the content of a specific note.
       
        Args:
            title: The title of the note to read
        “””
        if title not in notes_db:
            return f”Note ‘{title}’ not found.”
       
        note = notes_db[title]
        return f”””Title: {title}
    Created: {note[‘created_at’]}
    Updated: {note[‘updated_at’]}

    {note[‘content’]}”””


    @mcp.tool()
    def search_notes(keyword: str) -> str:
        “””
        Search notes by keyword in title or content.
       
        Args:
            keyword: The keyword to search for (case-insensitive)
        “””
        if not notes_db:
            return “No notes to search.”
       
        keyword_lower = keyword.lower()
        matches = []
       
        for title, data in notes_db.items():
            if keyword_lower in title.lower() or keyword_lower in data[“content”].lower():
                matches.append(title)
       
        if not matches:
            return f”No notes found containing ‘{keyword}’.”
       
        return f”Notes matching ‘{keyword}’:\n” + “\n”.join(f”- {title}” for title in matches)


    @mcp.tool()
    def delete_note(title: str) -> str:
        “””
        Delete a note by title.
       
        Args:
            title: The title of the note to delete
        “””
        if title not in notes_db:
            return f”Note ‘{title}’ not found.”
       
        del notes_db[title]
        return f”Note ‘{title}’ deleted.”

    Step 6: The Complete Server

    Here’s the full notes_server.py:

    “””
    MCP Notes Server
    A simple server that lets AI assistants manage notes.
    “””

    from mcp.server.fastmcp import FastMCP
    from datetime import datetime

    # Initialize the MCP server
    mcp = FastMCP(“notes”)

    # In-memory storage for notes
    notes_db: dict[str, dict] = {}


    @mcp.tool()
    def save_note(title: str, content: str) -> str:
        “””
        Save a note with a title and content.
       
        Args:
            title: The title of the note (used as identifier)
            content: The content of the note
        “””
        notes_db[title] = {
            “content”: content,
            “created_at”: datetime.now().isoformat(),
            “updated_at”: datetime.now().isoformat()
        }
        return f”Note ‘{title}’ saved successfully.”


    @mcp.tool()
    def list_notes() -> str:
        “””
        List all saved notes with their titles and creation dates.
        “””
        if not notes_db:
            return “No notes saved yet.”
       
        note_list = []
        for title, data in notes_db.items():
            note_list.append(f”- {title} (created: {data[‘created_at’][:10]})”)
       
        return “Saved notes:\n” + “\n”.join(note_list)


    @mcp.tool()
    def read_note(title: str) -> str:
        “””
        Read the content of a specific note.
       
        Args:
            title: The title of the note to read
        “””
        if title not in notes_db:
            return f”Note ‘{title}’ not found.”
       
        note = notes_db[title]
        return f”””Title: {title}
    Created: {note[‘created_at’]}
    Updated: {note[‘updated_at’]}

    {note[‘content’]}”””


    @mcp.tool()
    def search_notes(keyword: str) -> str:
        “””
        Search notes by keyword in title or content.
       
        Args:
            keyword: The keyword to search for (case-insensitive)
        “””
        if not notes_db:
            return “No notes to search.”
       
        keyword_lower = keyword.lower()
        matches = []
       
        for title, data in notes_db.items():
            if keyword_lower in title.lower() or keyword_lower in data[“content”].lower():
                matches.append(title)
       
        if not matches:
            return f”No notes found containing ‘{keyword}’.”
       
        return f”Notes matching ‘{keyword}’:\n” + “\n”.join(f”- {title}” for title in matches)


    @mcp.tool()
    def delete_note(title: str) -> str:
        “””
        Delete a note by title.
       
        Args:
            title: The title of the note to delete
        “””
        if title not in notes_db:
            return f”Note ‘{title}’ not found.”
       
        del notes_db[title]
        return f”Note ‘{title}’ deleted.”


    if __name__ == “__main__”:
        mcp.run(transport=”stdio”)

    That’s under 110 lines of code. Five tools. A complete MCP server.

    Step 7: Test the Server

    Before connecting to Claude, let’s verify the server works. The MCP SDK includes a development server:

    uv run mcp dev notes_server.py

    This starts an interactive inspector where you can test your tools manually. You’ll see all five tools listed, and you can call them with different inputs.

    Step 8: Connect to Claude Desktop

    Now let’s connect our server to Claude Desktop.

    Open Claude Desktop’s configuration file:

    • Windows: %APPDATA%\Claude\claude_desktop_config.json
    • macOS: ~/Library/Application Support/Claude/claude_desktop_config.json

    Add your server configuration:

    {
      “mcpServers”: {
        “notes”: {
          “command”: “uv”,
          “args”: [
            “–directory”,
            “C:/path/to/mcp-notes-server”,
            “run”,
            “notes_server.py”
          ]
        }
      }
    }

    Important: Replace C:/path/to/mcp-notes-server with the actual path to your project directory. Use forward slashes even on Windows.

    Restart Claude Desktop. You should now see a hammer icon (🔨) indicating MCP tools are available.

    Step 9: Use It

    Open Claude Desktop and try these prompts:

    “Save a note called ‘Meeting Notes’ with the content ‘Discussed Q1 roadmap. Action items: review budget, schedule follow-up.’”

    Claude will call your save_note tool and confirm the save.

    “What notes do I have?”

    Claude calls list_notes and shows your saved notes.

    “Search my notes for ‘budget’”

    Claude calls search_notes and finds the matching note.

    It works. Your Python functions are now accessible to an LLM. That’s MCP in action.

    What Just Happened?

    Let’s break down the flow:

    1. Claude Desktop spawns your server as a subprocess

    2. Protocol handshake happens automatically (remember Blog 2?)

    3. Claude queries tools/list and discovers your five tools

    4. When you ask about notes, Claude decides which tool to call

    5. Your Python function runs, returns a string

    6. Claude incorporates the result into its response

    You didn’t write any JSON-RPC handlers. No WebSocket code. No API routes. The SDK handled all of that.

    Adding a Resource (Bonus)

    Tools are great for actions, but what about data that should be pre-loaded into Claude’s context? That’s what Resources are for.

    Let’s add a Resource that exposes all notes as a single document:

    @mcp.resource(“notes://all”)
    def get_all_notes() -> str:
        “””
        Get all notes as a single document.
        “””
        if not notes_db:
            return “No notes available.”
       
        output = []
        for title, data in notes_db.items():
            output.append(f”## {title}\n\n{data[‘content’]}\n”)
       
        return “\n—\n”.join(output)

    Now Claude can read notes://all to get context about all your notes at once, without needing to call list_notes and read_note multiple times.

    Common Gotchas

    Print statements break stdio transport

    If you add print() statements for debugging, they’ll corrupt the JSON-RPC stream. Stdio uses stdout for protocol messages—your prints hijack that.

    Use logging instead:

    import logging
    logging.basicConfig(level=logging.DEBUG)
    logger = logging.getLogger(__name__)

    # This is fine
    logger.debug(“Processing request…”)

    Type hints matter

    The SDK generates input schemas from your type hints. If you write:

    def save_note(title, content):  # No type hints

    The schema won’t know what types to expect. Always annotate your parameters.

    Docstrings are your API docs

    The docstring becomes the tool description that Claude sees. Write clear descriptions—the LLM uses them to decide when to call your tool.

    What’s Next?

    You’ve built your first MCP server. In Blog 4, we’ll look at real-world patterns—how companies are using MCP to connect everything from Slack to databases to proprietary internal systems.

    The notes server is a toy. But the pattern is universal: expose functions as tools, expose data as resources, let the LLM orchestrate.

    This is the third post in a series on MCP. Here’s what’s coming:

    1. ✅ This Post: Why MCP matters

    2. ✅ Blog 2: Under the Hood—deep dive into architecture, transports, and the protocol spec

    3. ✅ Blog 3: Build Your First MCP Server in 20 minutes (Python/TypeScript)

    4. Blog 4: MCP in the Wild—real-world patterns and use cases

    5. Blog 5: Security, OAuth, and the agentic future

    For the official MCP examples, see the [quickstart-resources repo](https://github.com/modelcontextprotocol/quickstart-resources) and the [SDK examples](https://github.com/modelcontextprotocol/python-sdk/tree/main/examples).